Hello to anyone whom is reading this! I'm baaack! :) I'm giving this whole lifestyle blogging thing another go. This time I do think it will stick. I've got loads to blog about these days regarding my baby girl, everything that goes with that, cooking Gluten Free, as I was advised by my endocrinologist, and crafting!
I have discovered something about myself that totally makes sense. I'm a hoarder of buttons, fabric scraps, vintage brooch pieces, and other odds and ends. One day after a trip to a craft store, I typed in one phrase on google "altered art", and oh my goodness did I get an eyefull of goodness! I actually felt at home too, like I knew this was what I wanted to start doing. So, altering art, using mixed media, and finding creative "themes" to piece items together is my thing now, along with making gifts for friends.
I'm so excited to be back here, and this time reaching out and connect with other individuals like myself, whom are parents, GF cooking experts, and multi-media, altering, crafting artists!
Thanks for stopping by! Good things are coming your way!
xoxo,
Kristen

{DIY} Pin Wheels

Pinwheels, how can you go wrong? These are one of the cutest and quickest decorations out there to make! I featured a few weddings, over on that other blog of mine (Savvy Deets Bridal), that had pinwheels all throughout the wedding-as boutonnieres, centerpieces, and bouquets! I thought, how charming! I don't know if I ever made pinwheels before, so I gave them a shot, and oh wow, am I addicted to them now. My daughter's 1st birthday is just months away now, and I'm already thinking a pinwheel themed birthday is in order!
Pinwheels would be great for any event, such as bridal showers, weddings, baby showers, you name it. It comes down to the selection of your papers and embellishments.
Below is an example of how to assemble pinwheels. I happen to have the most wonderful gadget for crafters, the Silhouette Cameo! If you do have this or have access to one, you know what I mean when I say it literally does everything your heart desires! If you don't have one, cutting out the pattern is really easy, and I've attached the image below.

Supplies:
Craft Cutter/Scissors + Hole Punch
Decorative Brads (Hobby Lobby, Michaels, Jo-Ann's)
Step 1:
Cut out your pattern. Make a small hole punch "near" the corner pieces, as shown in the example.
Step 2 (3 & 4):
Lay your paper right side down, and fold the corners to match up with the center hole.

Step 5:
Insert a brad in the center, making sure to pick up every corner piece hole, then secure at the back.
Step 6:
Et voila! You are finished with your pinwheel!
Now it is a matter of what to do with the pinwheels. Make them in different sizes, and glue them to lollipop sticks or skinny dowels. Arrange them in a mason jar for fun centerpieces, like in the example below.
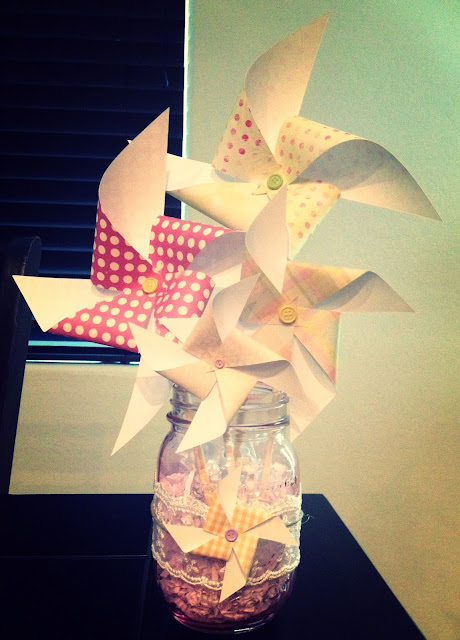
As much as pinwheels can be charming, they can also add an elegant splash of whimsy to any event by selecting the right color and patterned paper, and adding special embellishments, as seen below.

I loooove these decorative brads! They have them in all sorts of varieties, making it extra easy to add something snazzy to paper crafts.
I hope you enjoyed this little DIY and that it inspired you to get creative for your upcoming events!
{Recipes} Cinnamon Swirl Banana Bread

{Source}
I'm a baking fool these days! I have to wonder is this the "nesting" instinct, in preparation for baby, or the fact that the temps are cooler outside and it's time to bake? Either way it makes me really happy and content to bake and make my home smell divine.
Gripped by another Pinterest find, I whipped up this lovely banana bread this morning. What also inspired me were a bunch of browning bananas that we bought last week, which I had forgotten about, and wanted to use them up. Love how something I had on the back of my mind popped up in a "Pin" for me to take note of!
Here's how my bread turned out, wish you could smell this!

Recipe:
2 cups white whole wheat flour (or all-purpose flour)
3/4 tsp baking soda
1/2 tsp salt
1 tsp cinnamon
1/2 cup light brown sugar
4 Tbsp (1/2 stick) unsalted butter, softened to room temperature
2 large eggs
1 and 1/2 cups mashed very ripe banana (about 3 bananas)
1/3 cup vanilla greek yogurt (I used Chobani Vanilla 0%)
1 tsp vanilla extract
Cinnamon Swirl
1/4 cup sugar
1 tsp cinnamon
Simple Glaze
1/2 cup powdered sugar, sifted
1 Tbsp heavy cream (or half-and-half or milk)
Preheat oven to 350F. Spray a 9×5-inch loaf pan with cooking spray. Set aside.
In a medium bowl, whisk together the flour, baking soda, salt, and cinnamon. Set aside. In a separate large bowl, beat the brown sugar and butter with a stand or handheld mixer on medium speed until well blended – about 1 minute. Add the eggs one at a time, beating well after each addition. With a wooden spoon, stir in the mashed banana, yogurt, and vanilla. Slowly add in the dry ingredients. Do NOT overmix. Batter will be thick.
Spoon half of the batter into prepared loaf pan. Sprinkle with cinnamon-sugar swirl ingredients. Top with remaining batter. Bake for 40-45 minutes or until a wooden pick inserted in center comes out clean. Cool 15 minutes in the pan on a wire rack. Remove from pan and cool completely on the wire rack.
While the bread is cooling, make the glaze in a small bowl by combining the powdered sugar and heavy cream. Add more powdered sugar until you reached desired thickness. Drizzle over banana bread.

I followed everything to a "T" except I did not make the glaze, I felt it a little too indulgent. Also, the recipe calls for 1 1/2 cups of mashed bananas or 3 bananas. We had 5 bananas on the small side, and that amounted to 1 1/2 cups, so the number you have might vary. For the link to the recipe, click here.
Happy baking!
{Recipes} Chai Pumpkin Spice Thumbprint Cookies
OK, so I finally took a stab at something I saw on Pinterest! I'm addicted these days and have a lot of down time right now awaiting my overdue baby girl to finally arrive, so I'm on there pinning away my day looking for all kinds of "Pinspiration". While I am drawn to all things pretty and wedding related, I cannot help myself but to be lured by beautiful sweets!
One of those images I stumbled upon was this pinned image:


One of those images I stumbled upon was this pinned image:
I saw those gorgeous little gems and knew immediately I had to make them. And then I stopped dead in my tracks before going to the site that shared the recipe. What are those orange, or pumpkin rather, colored kisses? Intrigued I went to the blog, and learned that Hershey's has these Pumpkin Spice Kisses, and they are sold at Target! Well, I found this recipe a month or so ago, so I figured these fall kisses had to be a year old at least, but I never ever heard of them before!
I went to Target the other day, et voila, there they were!
I immediately purchased them, and as soon as I got into the car I ripped the bag open, like the desperate 10 month pregnant lady that I am, and popped one, then another into my mouth...YUM!! I do have to say I didn't need to eat the entire bag, they are pretty rich, and ooh so good. Too many I know I'd get sick, but wow was I missing out on these treats!
So, with the Pumpkin Spice Kisses in hand, I set out to make a batch of the Chai Pumpkin Spice Cookies. I'm a huge lover of chai lattes from Starbucks, by the way. In fact my order is "Iced Venti Soy Chai"-delish! I did do skim milk for a while, but I found soy cuts the spices a bit, however it isn't calorie friendly so I make it a treat, rather than a daily indulgence.
I happened to have Tazo Chai Concentrate, which is required for the recipe, so I got to work this morning. Before I provide you with the link to the blog that houses this pretty recipe, I must mention I did not have "chai spice" on hand, as it suggests. I don't know if it would make any difference. Here is the end result of my batch of the delicious cookies, which I am biased in loving, but they are also "husband approved", which I was surprised! Hubby cannot stand chai lattes and pumpkin isn't a fave flavor of his, but he sure liked these! Yay!
These are so simple to make, and are just fantastic! I will surely make them again this fall, and for years to come. Here is the link to the blog where the recipe can be found: Pass The Sushi
{DIY} Stained Mason Jars

I have a fun and easy diy to share with you today! If you have extra jars, mason jars or otherwise, lying around, Mod Podge, and food coloring, you can easily turn your plain jars, into beautiful color stained jars for centerpieces or home accents!

1. Here's what you need:
Mason jars
Food Coloring
Paint/Sponge Brush
Cardboard/Disposable Surface
Glass/Disposable Bowls
Paper Towels
I chose an old cardboard box to be the surface for this project, as I had no newspaper to lay down, or anything else to prevent leakage to seep onto my dining room table. This worked like a charm, but whatever you have is fine.
2. I filled some glass bowls I had available with 2 Tablespoons of Mod Podge, 1 teaspoon of food coloring, 1 teaspoon of water-this helps with transparency. I chose glass bowls because that is what I had, but you could use disposable bowls you might have, etc. I took my paint brush and mixed the MP, food coloring and water together until everything was well blended. You could eliminate the bowls and pour everything directly into the mason jars. I didn't do this I wanted to make sure everything was well blended.
3. I then poured the MP mixture into the mason jar, using the paint brush to help get all of the mixture into the jar. Then I slowly tilted the jar to let the pooled mixture begin to coat the sides of the jar, turning gently and tilting more as the coating made its way to the jar opening.
4. Once jar is completely coated on the interior, I let the jar sit upside down so any access mixture could drain. If you have gaps at the jar's opening, like I did, I took my paintbrush and kind of dabbed the brush around to easily cover up those gaps.
5. Once jars were coated with MP mixture in different colors, I let the jar sit outside to dry and for the coated material to turn into a transparent color.
6. After I felt the mixture was done pouring down the sides, I turned the jars right side up, and dried them in the sun. I took my paper towel, dampened it, and wiped any excess mixture that might have covered the lip of the jar. Everything came off easily. And after less than an hour of the jars sitting in the sun, the mason jars went from murky colored glass to pristine clear stained glass!
One tip...I wanted to do pink, yellow and green stained jars for my upcoming baby shower. I had the regular grocery store food coloring in green and yellow, but I had pink in the kind of food coloring you use to color melted candy. I thought I'd use that, and this did not work! Thus I have the examples of the green and yellow jars, but not the pink jar, it looked horrible! Use the regular old food coloring bottles that have been around for ages, and not the new kind that is for candy making!!
This project is perfect for your wedding and bridal shower centerpieces, and beyond. I can't wait to have these little cuties at my upcoming baby shower, with alternating flowers in the the color palette! The theme of the shower is "Cute as a Button", so I embellished the jar with some ribbon, twine and a button to play out the theme. Use your imagination to create the centerpieces to match your theme, and have fun!

Subscribe to:
Posts (Atom)