Showing posts with label scrapbook paper. Show all posts

{DIY} Pin Wheels


Pinwheels, how can you go wrong? These are one of the cutest and quickest decorations out there to make! I featured a few weddings, over on that other blog of mine (Savvy Deets Bridal), that had pinwheels all throughout the wedding-as boutonnieres, centerpieces, and bouquets! I thought, how charming! I don't know if I ever made pinwheels before, so I gave them a shot, and oh wow, am I addicted to them now. My daughter's 1st birthday is just months away now, and I'm already thinking a pinwheel themed birthday is in order!  

Pinwheels would be great for any event, such as bridal showers, weddings, baby showers, you name it.  It comes down to the selection of your papers and embellishments. 

Below is an example of how to assemble pinwheels.  I happen to have the most wonderful gadget for crafters, the Silhouette Cameo! If you do have this or have access to one, you know what I mean when I say it literally does everything your heart desires! If you don't have one, cutting out the pattern is really easy, and I've attached the image below.  

Supplies:
Craft Cutter/Scissors + Hole Punch
Decorative Brads (Hobby Lobby, Michaels, Jo-Ann's)

Step 1:
Cut out your pattern.  Make a small hole punch "near" the corner pieces, as shown in the example. 

Step 2 (3 & 4):
Lay your paper right side down, and fold the corners to match up with the center hole.  


Step 5
Insert a brad in the center, making sure to pick up every corner piece hole, then secure at the back.

Step 6:
Et voila! You are finished with your pinwheel!

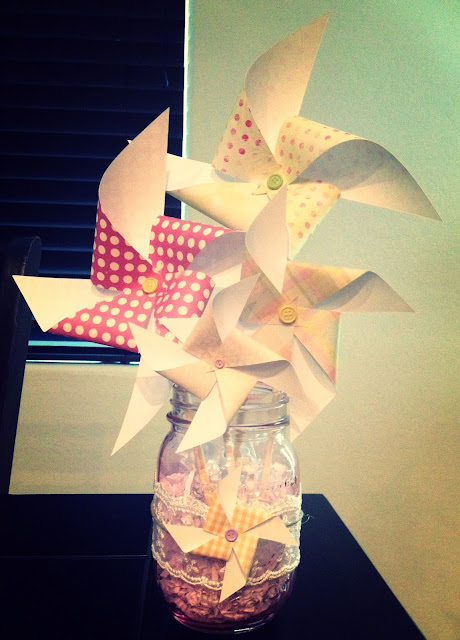
Now it is a matter of what to do with the pinwheels.  Make them in different sizes, and glue them to lollipop sticks or skinny dowels.  Arrange them in a mason jar for fun centerpieces, like in the example below. 


As much as pinwheels can be charming, they can also add an elegant splash of whimsy to any event by selecting the right color and patterned paper, and adding special embellishments, as seen below. 


I loooove these decorative brads! They have them in all sorts of varieties, making it extra easy to add something snazzy to paper crafts. 

I hope you enjoyed this little DIY and that it inspired you to get creative for your upcoming events! 

Gettin' Organized


I don't know if the "nesting" syndrome has kicked in, now that I'm 6 months along in my pregnancy, or if it's the fact we'll be moving into our home that is being built in November, or just that I simply need to get organized, but I've been busy! I have so much stuff for crafting that has been laying around in my guest room and master walk-in closets for too long, in an unorganized mess and I've had enough!

It seems that every time I have had a craft project, I would throw all the craft making supplies into a Michael's or Hobby Lobby bag, stash it on a shelf, and forget about it, until I need something from that bag.  Well no more! {At least I'm gonna try to make it no more!}

{DIY} Rolled Paper Flowers


I decided to do a little DIY project a few weeks ago, and am so excited to finally share!  I am loving the look of rolled paper flowers!  They make for perfect bridal bouquets at weddings, or simply displayed in a little vase for the home-great for gift giving, by the way

I was inspired to do this DIY from a post I saw from Jones Design Company.  The tutorial is really well done, and is a must read if you want to do this project yourself.  

Before you go check out the tutorial, I chose sheet music scrapbook paper to make my little bunch of paper flowers.  I'm a former musician {oboist}, what can I say, I have a soft spot for music staffs!  Anyway, I chose a variety of styles, from vintage looking paper-tea stained, to the classic-black and white.  Any type of paper would do justice, from newspapers, magazines, damask print scrapbook paper, the decision is yours, be creative and have fun!

Also, in the tutorial they suggest using hot glue.  Instead I used Amazing Goop-this stuff is genius! I don't like scorching my finger tips with searing hot glue, so I prefer the simpler method, and less equipment.  I glued the buds to brownie pop type sticks, which made for a sturdy bunch to help gather for a nice little bouquet.  The sticks, being paper, adhered rather quickly to the glue on the base of the paper bud.  

OK, here is the tutorial: Jones Design Company: Rolled Paper Flowers Tutorial.  If you decide to do this, please leave me a link to your creation-I'd love to see what you create! 

Enjoy this adorable & easy DIY!