Showing posts with label diy. Show all posts

{DIY} Pin Wheels


Pinwheels, how can you go wrong? These are one of the cutest and quickest decorations out there to make! I featured a few weddings, over on that other blog of mine (Savvy Deets Bridal), that had pinwheels all throughout the wedding-as boutonnieres, centerpieces, and bouquets! I thought, how charming! I don't know if I ever made pinwheels before, so I gave them a shot, and oh wow, am I addicted to them now. My daughter's 1st birthday is just months away now, and I'm already thinking a pinwheel themed birthday is in order!  

Pinwheels would be great for any event, such as bridal showers, weddings, baby showers, you name it.  It comes down to the selection of your papers and embellishments. 

Below is an example of how to assemble pinwheels.  I happen to have the most wonderful gadget for crafters, the Silhouette Cameo! If you do have this or have access to one, you know what I mean when I say it literally does everything your heart desires! If you don't have one, cutting out the pattern is really easy, and I've attached the image below.  

Supplies:
Craft Cutter/Scissors + Hole Punch
Decorative Brads (Hobby Lobby, Michaels, Jo-Ann's)

Step 1:
Cut out your pattern.  Make a small hole punch "near" the corner pieces, as shown in the example. 

Step 2 (3 & 4):
Lay your paper right side down, and fold the corners to match up with the center hole.  


Step 5
Insert a brad in the center, making sure to pick up every corner piece hole, then secure at the back.

Step 6:
Et voila! You are finished with your pinwheel!

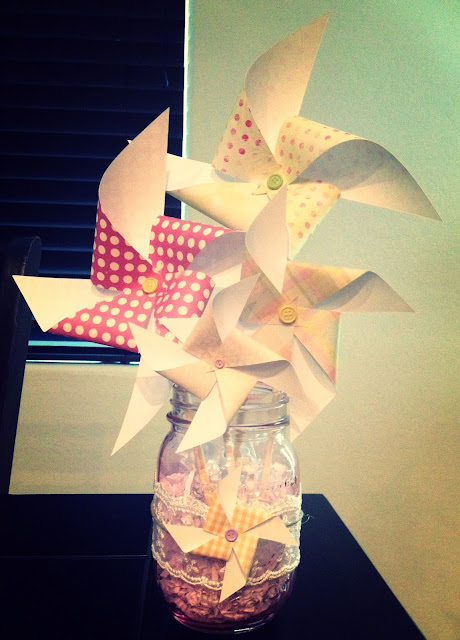
Now it is a matter of what to do with the pinwheels.  Make them in different sizes, and glue them to lollipop sticks or skinny dowels.  Arrange them in a mason jar for fun centerpieces, like in the example below. 


As much as pinwheels can be charming, they can also add an elegant splash of whimsy to any event by selecting the right color and patterned paper, and adding special embellishments, as seen below. 


I loooove these decorative brads! They have them in all sorts of varieties, making it extra easy to add something snazzy to paper crafts. 

I hope you enjoyed this little DIY and that it inspired you to get creative for your upcoming events! 

{DIY} Stained Mason Jars


I have a fun and easy diy to share with you today!  If you have extra jars, mason jars or otherwise, lying around, Mod Podge, and food coloring, you can easily turn your plain jars, into beautiful color stained jars for centerpieces or home accents!


1.  Here's what you need:
Mason jars
Food Coloring
Paint/Sponge Brush
Cardboard/Disposable Surface
Glass/Disposable Bowls
Paper Towels

I chose an old cardboard box to be the surface for this project, as I had no newspaper to lay down, or anything else to prevent leakage to seep onto my dining room table.  This worked like a charm, but whatever you have is fine.  

2.  I filled some glass bowls I had  available with 2 Tablespoons of Mod Podge, 1 teaspoon of food coloring, 1 teaspoon of water-this helps with transparency.  I chose glass bowls because that is what I had, but you could use disposable bowls you might have, etc.  I took my paint brush and mixed the MP, food coloring and water together until everything was well blended.  You could eliminate the bowls and pour everything directly into the mason jars.  I didn't do this I wanted to make sure everything was well blended.  

3.  I then poured the MP mixture into the mason jar, using the paint brush to help get all of the mixture into the jar.  Then I slowly tilted the jar to let the pooled mixture begin to coat the sides of the jar, turning gently and tilting more as the coating made its way to the jar opening.  

4.  Once jar is completely coated on the interior, I let the jar sit upside down so any access mixture could drain.  If you have gaps at the jar's opening, like I did, I took my paintbrush and kind of dabbed the brush around to easily cover up those gaps.  

5.  Once jars were coated with MP mixture in different colors, I let the jar sit outside to dry and for the coated material to turn into a transparent color.  

6.  After I felt the mixture was done pouring down the sides, I turned the jars right side up, and dried them in the sun.  I took my paper towel, dampened it, and wiped any excess mixture that might have covered the lip of the jar.  Everything came off easily.  And after less than an hour of the jars sitting in the sun, the mason jars went from murky colored glass to pristine clear stained glass!  

One tip...I wanted to do pink, yellow and green stained jars for my upcoming baby shower.  I had the regular grocery store food coloring in green and yellow, but I had pink in the kind of food coloring you use to color melted candy.  I thought I'd use that, and this did not work!  Thus I have the examples of the green and yellow jars, but not the pink jar, it looked horrible!  Use the regular old food coloring bottles that have been around for ages, and not the new kind that is for candy making!!  

This project is perfect for your wedding and bridal shower centerpieces, and beyond.  I can't wait to have these little cuties at my upcoming baby shower, with alternating flowers in the the color palette! The theme of the shower is "Cute as a Button", so I embellished the jar with some ribbon, twine and a button to play out the theme.  Use your imagination to create the centerpieces to match your theme, and have fun!

{DIY} Tissue Paper Poms


I love nothing more than to turn a .99 cent store supply into cute decorations for a party!  I will be making these Tissue Paper Poms for my upcoming baby shower, but they are great for any occasion.  They work especially well over a dessert table, for example.  

The process is simple, the supplies are easy to come by.  

1.  Here's what you need:
  • Scissors
  • Tissue Paper
  • Twine/Hanging Wire
2.  For this example I chose to make a large scale pom in light blue.  I used 10 sheets of tissue paper, aligned them together, and went to folding like an accordion.  I started at one end, folded 1 1/2" in, then flipped the pile over and folded that section 1 1/2", and continued back and forth till I got to the end.  

Then I took the twine and wrapped it around the center of folded tissue, and rounded the edges with my scissors.  Because this is a large sized pom, cutting a nice even rounded end was a little bit tough, but if you have good scissors this shouldn't be a problem.  

You could also cut the edges into points, like so:


3.  Then I began to gently peel the layers of tissue, so they would form a nice round ball.  I began with one side, as seen in image 3, flipped that over and did the other side.  I flipped back and forth until I had a fluffy tissue paper pom.  I did fluff the pom a bit to fill gaps and make sure it all looked even and full.  


4.  And voila, we have an easy and cost effective way to decorate for any occasion.  Because this is for a baby girl baby shower, I chose light shades of pink, green and yellow as that is the color palette.  You could make an ombre effect, starting with white, then light pink, pink then dark pink and red, for example, or whatever you want to do.  

Can't wait to have these at the shower!    

Up-cycling: Turn that antique mirror into a chalkboard!

I am enamored by unique ways to create a chalkboard pieces, be it for decor, function, or both!

I've seen so many ways to turn different items into chalkboards, and I wanted to make one.  As we are getting ready to move in a few months, I've been going through different items in the home, and recently I came across an old mirror that belonged to my great grandmother.  The frame is in excellent condition, the mirror not so much.  Rather than get rid of it, I decided to turn the mirror into a little chalkboard piece to display in the home.  

I went out to seek some chalkboard paint the other day, and found "chalk paint".  It's not a chalkboard paint per say, but the ladies that helped me advised a few coats can make any surface as a chalkboard.  I purchased the little jar, and ran home to turn my mirror into something special.  


The chalk paint is really smooth, and glided on with such ease.  I painted with 3 layers to build the base for the chalkboard.  


I let this dry for over an hour, and went to town with writing.  I do have to admit, I did this once, and when I wrote with the chalk a bit of the paint came off and the mirror was exposed (insert frown face).  However, because the paint is chalk based, I thought to wash the mirror clean, and try again-it worked!!  Practice makes perfect, right?

And the final result:

I'm so thrilled with the way this turned out, and that I didn't have to get rid of the mirror!  I really wouldn't have tossed the frame, it is just too pretty, but I immediately found a use for it!  

Have you created a chalkboard out of something ordinary to now make it extraordinary?  Please share!

Hangers with Words


One of my favorite projects I sought out to create were hangers with words.  I first learned of these through the bridal blogosphere, as nearly every single blog had them in bridal gown images.  The hangers with wired words are more attractive than the plain plastic hangers, a fact a wish I had known 3 years ago!

All is not lost, though, the hangers aren't just for brides, they can be for any occasion actually.  Since I am a mom-to-be, I thought why not make one for my baby girl?  Here is my little tutorial for making Hangers with  Words.  It's rather simple to do.

Supplies:
16 guage floral wire
hanger (for shirts/dresses)


Directions:
1)  Start off by writing your word onto a piece of paper.  Write it rather large, and in a cursive style that will be easy to trace with wire.  Remember the old school days of writing in the form of D'Nealian? Kind of use that reference to writing your big loopy letters.

2)  I chose 16 guage floral wire, as it is easy to bend and work with.  I started with the end section, went in about 1 1/2" and then bent it-this will be the part that wraps around the hanger.

3)  I then wrapped that end around the slot on the hanger, wrapping twice to make sure it would hold taught.  Once I had the end piece secured, I aligned the wire to the width of the hanger to figure out where my start point would be for the word.  With the word "baby" already written down, it helped guide me to where that starting point would be.

4)  To really work with the wire, I removed it from the hanger, keeping the form bent where the end section was, so I wouldn't lose track of it.  Then I started in tracing the wire around the letters as best as I could, holding the wire firm with my left hand, and looping with my right hand.  As I mentioned 16 gauge wire is rather easy to work with, and is quite bendy.

5)  From this point it is up to you on how to maneuver the wire around the wording.  Play with looping over or under with each letter if it looks off.  With the "Mrs" wire, seen at the top of this post,  I really had to figure out the r and the s to make it look the way I liked it.  Having the word printed as a guide truly helps!

6)  Once you are happy with your word, then take your wire after the last letter, hold that tight, and section off another 1 1/2" and wrap that around the opposite slot on the hanger.  I made sure that the end piece would not be seen from the front facing hanger, so when I wrapped it around, the end nicely fell to the back side.  And there you have it!


It's so cute, and makes a great gift to give someone, or even yourself!  You can be as simple as pictured here, or doll up the hanger even more with a pretty bow, wrap the hanger itself in yard or silk, the possibilities are endless.  Have fun and enjoy this project!


Turn those old Christmas Cards into Gift Tags!


This summer, the major theme of my projects will be Christmas/Holiday themed.  There is a very excellent reason for this, although any excuse to be creative with Christmas in mind is a good a reason as any, in my world.  However, come the fall I will have a newborn baby to take care of, and less time to devote to crafting and creating for the holiday season.  At least I foresee this anyway.  So, I have decided to make a majority of my Christmas/Holiday projects now, while I can and am able to!

{DIY} Brooch Bouquet


Finally got around to making the DIY project I have long had on my to do list, the Brooch Bouquet!  

I really loved this project, but it took its time.  I first had to collect enough brooches & accessories to make enough for a bouquet.  I reached out to family for passed down brooches, I scoured some antique shoppes, & found a few brooches that were made to look vintage, just to round out the bouquet. 

Here is the how to process:

{DIY} Burlap Wreath

Aww, the wonders of burlap.  When I first learned of burlap being a frequented fabric for amazing projects, both beloved by professionals and DIY-ers, I began to tune in with much awe.  I then began research to find out what I could do with burlap, and went out to find my burlap garland, a good place to begin for a first time burlap user.

Today I bring to you a wreath, made of burlap! Pretty easy to put together, I might say!

Tools:
Burlap Garland-5 yards/12 feet
16 Gauge Wire-3 yards/3 feet
Steel Ring-12"
Hemp Twine
Ribbon/Lace Trim


{DIY} Doily Mason Jars


Can it get any sweeter than a mason jar covered in a doily?

I found this DIY idea on Sparkle and Hay's blog, and as soon as I saw it, I knew I had to create my own.  Before you check out the very detailed how to on their blog, here are a few ways I dolled up my doily mason jars:

{DIY} Burlap Runner

I'm on a burlap roll, have you noticed?  Last week I gave a go at a Burlap Wreath, this week I gave a go at a Burlap Runner! What will next week bring, I wonder?!

I came upon some fabulous burlap table runner ideas found at Emmaline Bride to name a few resources, there are tons! The version there has a frayed edging, which wasn't working out for me, so I put together my example below with a vintage looking trim, which resembles doilies to me.

This project is super easy, are you ready?


{DIY} Button Bouquet

Sometimes it doesn't get cuter than re-purposing items for a new use, especially buttons!


Today I am sharing with all of you Savvy Deets Bridal readers, a tutorial on re-purposing buttons to be used in a fun alternative bouquet idea, the button bouquet!

{DIY} Rolled Paper Flowers


I decided to do a little DIY project a few weeks ago, and am so excited to finally share!  I am loving the look of rolled paper flowers!  They make for perfect bridal bouquets at weddings, or simply displayed in a little vase for the home-great for gift giving, by the way

I was inspired to do this DIY from a post I saw from Jones Design Company.  The tutorial is really well done, and is a must read if you want to do this project yourself.  

Before you go check out the tutorial, I chose sheet music scrapbook paper to make my little bunch of paper flowers.  I'm a former musician {oboist}, what can I say, I have a soft spot for music staffs!  Anyway, I chose a variety of styles, from vintage looking paper-tea stained, to the classic-black and white.  Any type of paper would do justice, from newspapers, magazines, damask print scrapbook paper, the decision is yours, be creative and have fun!

Also, in the tutorial they suggest using hot glue.  Instead I used Amazing Goop-this stuff is genius! I don't like scorching my finger tips with searing hot glue, so I prefer the simpler method, and less equipment.  I glued the buds to brownie pop type sticks, which made for a sturdy bunch to help gather for a nice little bouquet.  The sticks, being paper, adhered rather quickly to the glue on the base of the paper bud.  

OK, here is the tutorial: Jones Design Company: Rolled Paper Flowers Tutorial.  If you decide to do this, please leave me a link to your creation-I'd love to see what you create! 

Enjoy this adorable & easy DIY! 


{DIY} Fabric Roses

Fun with Fabrics: Burlap & Denim


This summer has been the season of making flowers out of wonderful materials, and none better than with fabric-especially burlap!  Oh how I've been turned onto burlap, and how I've been without this material for my entire life, a sad fact until lately!  

I made the burlap roses after being inspired by a few fabric rose tutorials, and went to town without taking pics for a tutorial.  So, I came across a sweet deal at Joanne's Fabrics on denim, and decided to make fabric rosettes with this equally amazing and rustic material!  

Here's the tutorial on making roses, with any fabric:

{DIY} No Sew Decorative Pillow


Happy Labor Day, everybody!  How did you spend your day off?  DIYing like me?  However you spent your holiday, I hope you are relaxed and rejuvenated for the short work week ahead! For those not in the U.S., I hope you had a lovely Monday!

Onto today's DIY goodness, I am all about projects that are no sew!  I think many can relate my delight of saving string and needles for adhesive bonding products for fabric and other uses. 

For starters, I do not have a sewing machine, which is on my wishlist this year.  My husband has been floored about my DIY projects this year, and has dropped a few hints I might find a sewing machine under the Christmas tree this year!  Another point, I cannot sew by hand-if I do, it is to sew a fallen button and that is it!  Stitching in a straight line is not my forté.  For now, I opt to find no sew projects! 

I whipped up this no sew pillow today in about 30 minutes, from start to finish, it was very easy to do, and required few supplies-another plus.  

Here's what you need:
2 12" X 12" Fabric Squares (I used denim)
Scissors
8 12" strips of Adhesive Bonding Tape (Found at Hobby Lobby) 
Trim (I used vintage looking crochet lace)


Step 1:
Cut your fabric into 12" squares, or whatever size you desire.  I chose 12" as a pretty average sized decor pillow.  I used my yard stick to help measure the squares out, and to help keep cutting the edge straight.


Step 2:
Lay your fabric so that the underneath part is facing up.  Cut up your 4 adhesive bonding strips, and apply 3, reserve the 4th to be used at the end of the project.  Lay the adhesive strip along the edges.  The adhesive bonding is double sided, so once you've adhered the strips to the fabric, pull off the backing of the strips to reveal the other side of the the very stick stuff.  This part is tricky, the backing can be tough to pull away from the adhesive, but promise me, it will.  

Not pictured here, I laid out the 4th piece of adhesive for the uncovered edge, and kept the backing on-I did this to simply remind me to not over stuff the pillow, which you will see soon.  

Step 3:
Take your 2nd piece of fabric, making sure it is facing upwards, and carefully align the piece with the awaiting piece of fabric.  Once you adhere the pieces together pulling apart to correct can be tricky as well, so you want to really make sure you are lined up exactly, and in one try-it's not that difficult, just make sure everything is even.  

Once you have completed this step, you will have a fabric "pocket".  -Sorry I don't have a pic of this, but I hope you get the idea...


Step 4:
Get out the remaining strips of adhesive bonding tape, and begin covering the 3 edges of your fabric pocket.  The trick here, align the adhesive so that half of it is on the fabric, and the other half hanging over.  Once you've adhered to the fabric, fold over the overhang to then adhere to the other side-this is what you will adhere your trimming to.  Think of it as sealing your edges, and using the trim to cover up the exposed edges, which aren't really pretty.  

Now take out your trim, and align exactly to the adhesive bonding tape.  Same as before, align with half of the trim adhered to the edge, then fold the remaining half over adhering to the opposite edge, covering the sealing you've already laid out.  

Now your fabric pocket is sealed and covered in pretty trim, as seen below.  I made the top part have a little less trimming to mark as the top of the pocket.  You don't have to do this, but I chose to add a little character.  


Step 5:
The next part is easy, stuffing the pocket to create a pillow!  I chose to use leftover wedding gift wrap paper I had, and was in no shape to get reused for a wedding gift.  You can use anything to fill your pocket, from regular pillow stuffing, to tissue paper, whatever you want to use, and in my case reuse for a new purpose.

I stuffed in the gift wrap, and made sure to level it out so that the pillow wouldn't be lop sided.  


As mentioned earlier with leaving the adhesive strip with the backing on it (which can be seen pictured above with the trimmed pocket), I held the pocket open with one hand, while I pulled the backing off, and then gently made sure the edges aligned evenly.  I then sealed the edge and covered in trimming as I did with steps 3 & 4.

Et voila!  You have an adorable no sew pillow!


The fun part come in adding little embelishments to spruce up the pillow to match your decor, whether for an event, such as a bridal shower or wedding reception, or home decor!  As usual if you create DIY projects for wedding receptions, more often those items can be used to decorate your newlywed haven!

I chose denim because I had plenty left over prom a previous and fun project, Fabric Roses (denim & burlap), tutorial seen here.  I used a few of those fabric roses to decorate the pillow with.  I adhered the roses to brooch pin backs, rather than to the fabric itself, so that I can change out embelishments when I desire to do so.  Brooch pin backs can be found at any craft store, by the way, and are rather cheap to come by.

I do foresee making more pillows with the coming holidays, even giving a few as gifts!  Are you up to making your own no sew pillow?  Leave a comment to let me know if this is in your future, especially the link to your pillow so I can see your creation! 

Happy DIYing!