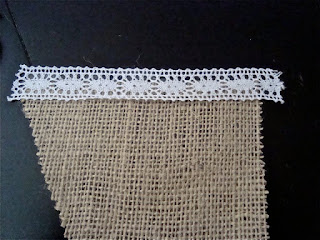
I came upon some fabulous burlap table runner ideas found at Emmaline Bride to name a few resources, there are tons! The version there has a frayed edging, which wasn't working out for me, so I put together my example below with a vintage looking trim, which resembles doilies to me.
This project is super easy, are you ready?
Tools:
4' of Burlap
Adhesive Bonding Tape (no iron needed)
Pinking Sheers
Ribbon/Trim
I'm using a small piece of burlap here to give an up close example. I found my burlap at Hobby Lobby, and the representative in the fabric department cut 3 yards of burlap, cost about $3-$4. The piece I was cut was so large I had to fold it in half and use pinking sheers to cut in half. I chose to trim down to 4 feet, with a bit more to fine tune the measurements.
Step 1
Simply take your adhesive bonding tape, and align along the edge, with a bit hanging over the edge, as shown below.
Step 2
Once your tape is in place, grab your ribbon/trim, and cover it exactly over the adhesive tape. If you have some burlap strands peaking through simply trim them off with your pinking sheers. I had a few on my large piece that I trimmed away. When the trim was covering the tape, I pressed down to make sure the adhesive tape would hold onto the trim. This stuff really sticks firmly once pressed, which is awesome! I love this product, no need to heat, and sew, which is a major score for me!
And, that is it!!
This process is so simple, however a bit of attention to some details is advised. Be aware of where you place your adhesive bonding as you go along the edge of your long burlap piece. Try not to get the adhesive on the surface you will be using. If you do, and residue is left over, simply take a dampened cloth, and rub over the area-it will collect into little balls to easily clean up.
The adhesive tape is easy to want to slap on quickly. My suggestion is start at the right end, hold the adhesive roll with your left hand, and as you unroll, sticky side down of course, your right hand should be applying pressure and guiding your left hand to make sure you are staying along the edge, rather than too far over the edge or too far below the edge. Its kind of a finger tip sliding motion as you travel down the edge of the burlap.
Same thing goes with the ribbon/trim you decide to lay over the tape. I chose the vintage looking doily-like trim in a beige color, it works for the tone of the burlap fabric, and keeps it almost rustic.
But literally, this took no time. I decided to place my burlap runner on our armoire, it needed some sprucing up. This is creation is perfect for the home, obviously, but as well for any of you DIY brides looking for ways to incorporate burlap for your reception.
My husband is even a fan of the addition to our home! Enamor your guests by creating this project for your reception tables or dessert table! After the wedding is over, take the runners home and use them about the house, you just supplied yourself with table dressing in your newly married home!
Enjoy crafting for your big day, or simply for your home!


No comments:
Post a Comment